My Saturday plans for a day-long horse thang fell through so I woke up and firmly planted myself on the couch. I sat there for all of about 10 minutes before deciding I Could. NOT. spend my day like that! Staring into the kitchen I decided to dive right in and FINALLY tackle the Board and Batten I’ve been dreaming of. …and O.M.G. As I sit here Monday night, I couldn’t be happier!
Enough rambling… lets dive in! I consulted my favorite B&B how-to posts here and here to drum up some courage.
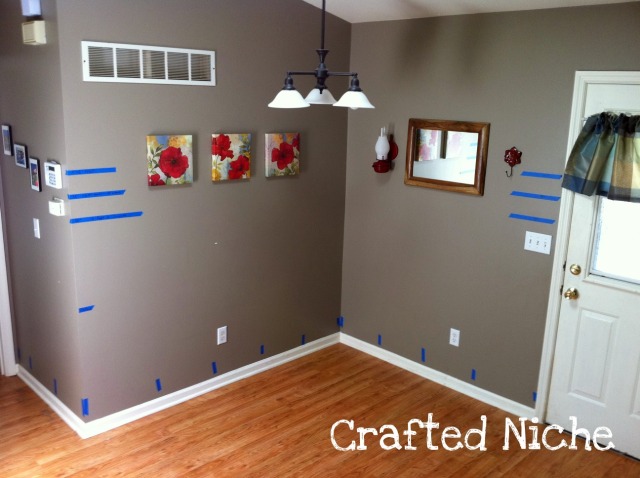
So I jumped off the couch, cleared the table and chairs out of the room, rolled up the rug and grabbed some painters tape. First decision was how tall to make the B&B. My first thought was 48″ so that I could get two vertical boards out of each 8′ board. Second thought was 5′ tall because I’ve seen that many times. …and the line in the middle (photo below) was an attempt to go UNDER the alarm system. That was the hardest part… finding a height that would avoid the thermostat and alarm panel. Impossible. Trust me… I tried. If I went any higher my pictures would be hidden behind the light fixture!
The blue tape 1/3 of the way up the wall on the left is the table height. I thought it would help me picture the B&B in relation to the table height. Also, the vertical snippits of tape were to plan out where my battens would be placed. 16″ seemed to be the perfect distance!
Off to Blue to do some shopping! I decided to use MDF pre-primed boards for this project. Any time I can skip priming I’m ALL for it! I bought 2.5 inch boards for my vertical battens and 3.5 inch boards for the horizontal top board and shelf/ledge. Also snagged a tube of caulk and 2 tubes of adhesive. Game on!
I’d like to personally thank whomever was responsible for designing the Mercury Mariner. It is the PERFECT length to accommodate my 8′ boards!
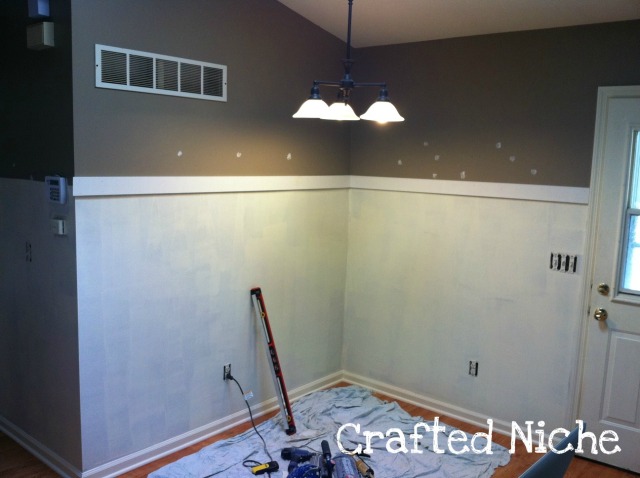
Once home, I marked my TOP board height and ran a strip of tape around the room under where that board would be nailed. You’ll see in the pic below I decided to try to line up the top board with the top of the alarm panel. I couldn’t go above the panel because it has a tab that pulls up a good 5 inches. I also removed the plates and spackled all the existing nail holes. Get used to those white spots… they’re going to be there for most of this DIY update!
No turning back now! There’s no way I was going to repaint the wall grey. No choice but to move forward.
Have I mentioned how much I love my miter saw? L.U.V. it! Each board was glued and nailed to the wall. Unfortunately I don’t have any pics of the boards while they were going up. …but you should have seen me STRUGGLING with that top board on the left. It was just long enough to not be able to balance/press it to the wall with one hand while also holding the level AND the nail gun. Lets just say I shoved my cheek up against the board with the level right at my eyeball… left hand stretched out to adjust the board and right hand with the nail gun. I should have been a juggler!
Eeeek! At this point I was SO excited!
Sorry about the poor pic quality! It’s so hard to take pictures in this room! Here you can see the cut I made for the corner (and my wam-bam primer job around the alarm panel).
Note my highly technical measurement strategy above. Basically stretch out the tape measurer and just eyeball it for 16″. Yup… that’s how I roll.
TIME OUT!
At this point my nail gun stopped working. GASP! PANIC! (cry in frustration) SCREAM! (just a few tears) I was out of nails and it was a half hour down to Blue to buy more. Noooooooo! Everything was going so quickly. Until now. Dang it! It was about 5pm on Saturday night and I was ready to throw in the towel and admit Nail Gun Defeat. I made one last ditch effort and ran out to the shed to search for nails.
Wait… WHAT! I have a second nail gun! How did I forget this? Don’t let my roots fool you, I really am a blonde sometimes. It’s a finish nailer though rather than a brad nailer and still new in the box. Oh what the heck… why not give it a go. Crisis averted.
TIME IN!
I slapped up the rest of the vertical boards and then added the ledges. Oh how I heart the ledges. They were glued and nailed (a lot) along the top board.
I thought my walls were straight and flat…. right up until the shelf boards went up. Reality Check! I had to do some serious caulking to fill these gaps!
Whoops… should probably remove that sticker! The rest of Day One (which was now NIGHT One) was spent caulking…. right up until I ran out. Duh. Dana… you’re going to need more than one tube. Lesson learned!
Here’s where the project stood at the end of the night…
Hope everyone had a great Labor Day weekend! Just wait til you see what I tackled on Sunday and Monday! I’ve been a busy, busy girl!


[…] Comments « Board Outta my Mind! […]